

How To - Manually setup Docker on WSL

 without Docker Desktop - DEV Community")
Docker Desktop is amazing at setting up Docker on a Windows machine in a very automated way. It does this task almost too well and helps break down the Docker barrier for people wanting to dabble with Docker.
While it may seem like you have to use Docker Desktop… you actually don’t need to use it. Docker Desktop is bloated, isn’t truly free, and has telemetry reporting.
Docker Desktop isn’t free.
The fine print is:
It is free for small businesses (fewer than 250 employees AND less than $10 million in annual revenue), personal use, education, and non-commercial open-source projects. Otherwise, it requires a paid subscription for professional use. Government entities are also required to pay subscriptions.
Docker Desktop is bloated.
For what you get, I don’t think Docker Desktop gives you all that much that you can’t get elsewhere. You can often do much better.
WSL, Docker and Portainer combo
This is the combo I recommend you replace Docker Desktop with. This post will go over installing Ubuntu after WSL has already been installed.
Installing Ubuntu on WSL
Installing Ubuntu on Windows has become so very easy. When you install WSL, it will automatically install Ubuntu. For this post, I deleted the default install and will re-create it.
First run:
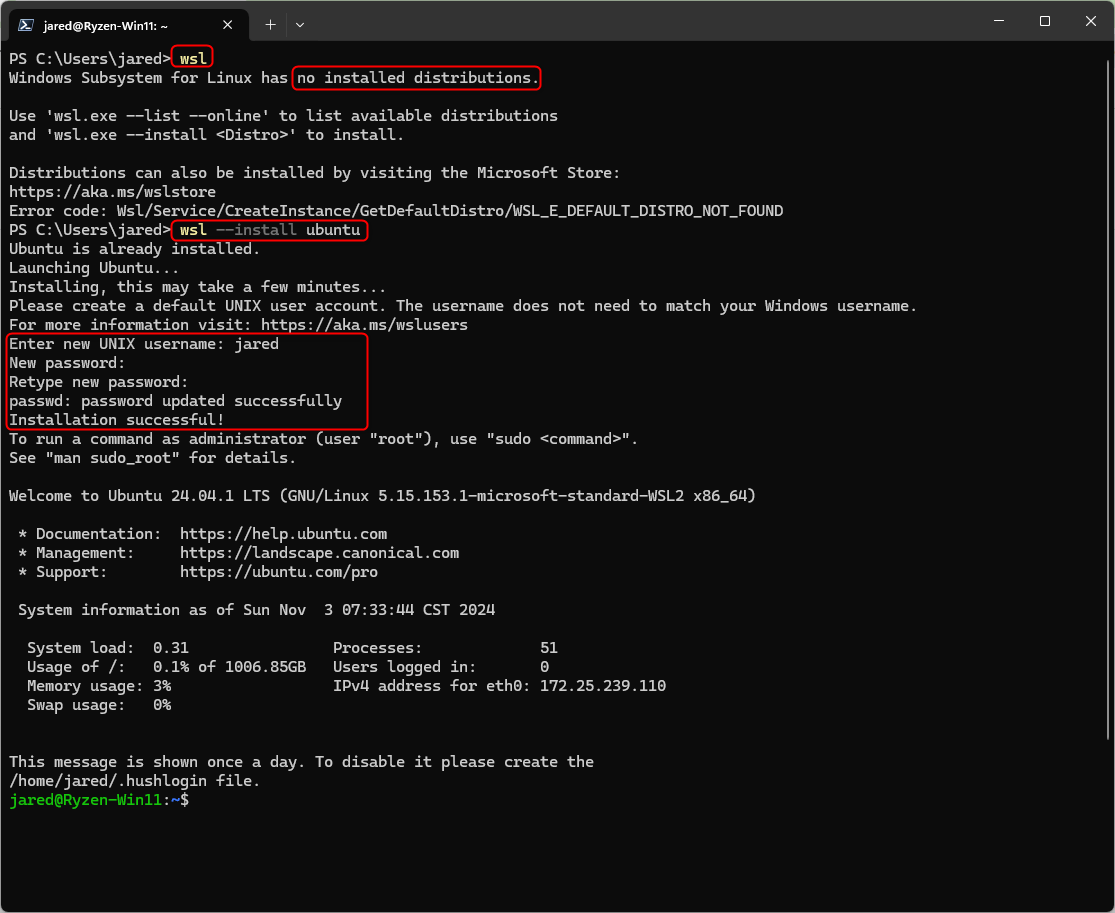
wslThis will show you if you have any Linux distros installed.
Windows Subsystem for Linux has no installed distributions.
-------------------------------------------------------------
Use 'wsl.exe --list --online' to list available distributions
and 'wsl.exe --install <Distro>' to install.
Once you have verified there are no distros installed, type:
wsl --install ubuntuThis will walk you through a text-based installer at the command prompt. Once it is done, it will ask you to enter a username and password (x2).
Copy and paste this code into the prompt to install docker:
sudo apt-get update
sudo apt-get upgrade
sudo apt-get install ca-certificates curl
sudo install -m 0755 -d /etc/apt/keyrings
sudo curl -fsSL https://download.docker.com/linux/ubuntu/gpg -o /etc/apt/keyrings/docker.asc
sudo chmod a+r /etc/apt/keyrings/docker.asc
echo \
  "deb [arch=$(dpkg --print-architecture) signed-by=/etc/apt/keyrings/docker.asc] https://download.docker.com/linux/ubuntu \
  $(. /etc/os-release && echo "$VERSION_CODENAME") stable" | \
  sudo tee /etc/apt/sources.list.d/docker.list > /dev/null
sudo apt-get update
sudo apt-get install docker-ce docker-ce-cli containerd.io docker-buildx-plugin docker-compose-plugin
sudo docker run hello-world
This will make sure Ubuntu in WSL is all patched and up to date. It will also install Docker and test it by running the Docker “Hello World” container. If you see this you know you have done everything correctly:
Hello from Docker!
This message shows that your installation appears to be working correctly.

To generate this message, Docker took the following steps:
 1. The Docker client contacted the Docker daemon.
 2. The Docker daemon pulled the "hello-world" image from the Docker Hub.
    (amd64)
 3. The Docker daemon created a new container from that image which runs the
    executable that produces the output you are currently reading.
 4. The Docker daemon streamed that output to the Docker client, which sent it
    to your terminal.

To try something more ambitious, you can run an Ubuntu container with:
 $ docker run -it ubuntu bash

Share images, automate workflows, and more with a free Docker ID:
 https://hub.docker.com/

For more examples and ideas, visit:
 https://docs.docker.com/get-started/
Next, we will add my “jared” Ubuntu user to the docker group:
sudo usermod -aG docker $USER
sudo -u jared sh groups
wsl.exe --shutdown
Hit Enter to restart WSL
[process exited with code 1 (0x00000001)]
You can now close this terminal with Ctrl+D, or press Enter to restart.
As you can see we’ve made installing Docker almost as easy as Docker Desktop. The only thing left to get up and running is “Portainer”.
We will now install Portainer. Installing it is very easy and the instructions on the Portainer website are easy to follow. PORTAINER WSL SETUP LINK
sudo docker volume create portainer_data
docker run -d -p 8000:8000 -p 9443:9443 --name portainer --restart=always -v /var/run/docker.sock:/var/run/docker.sock -v portainer_data:/data portainer/portainer-ce
After downloading and installing the Portainer container app you can check and see that it is now running. You can do this by typing this command:
docker ps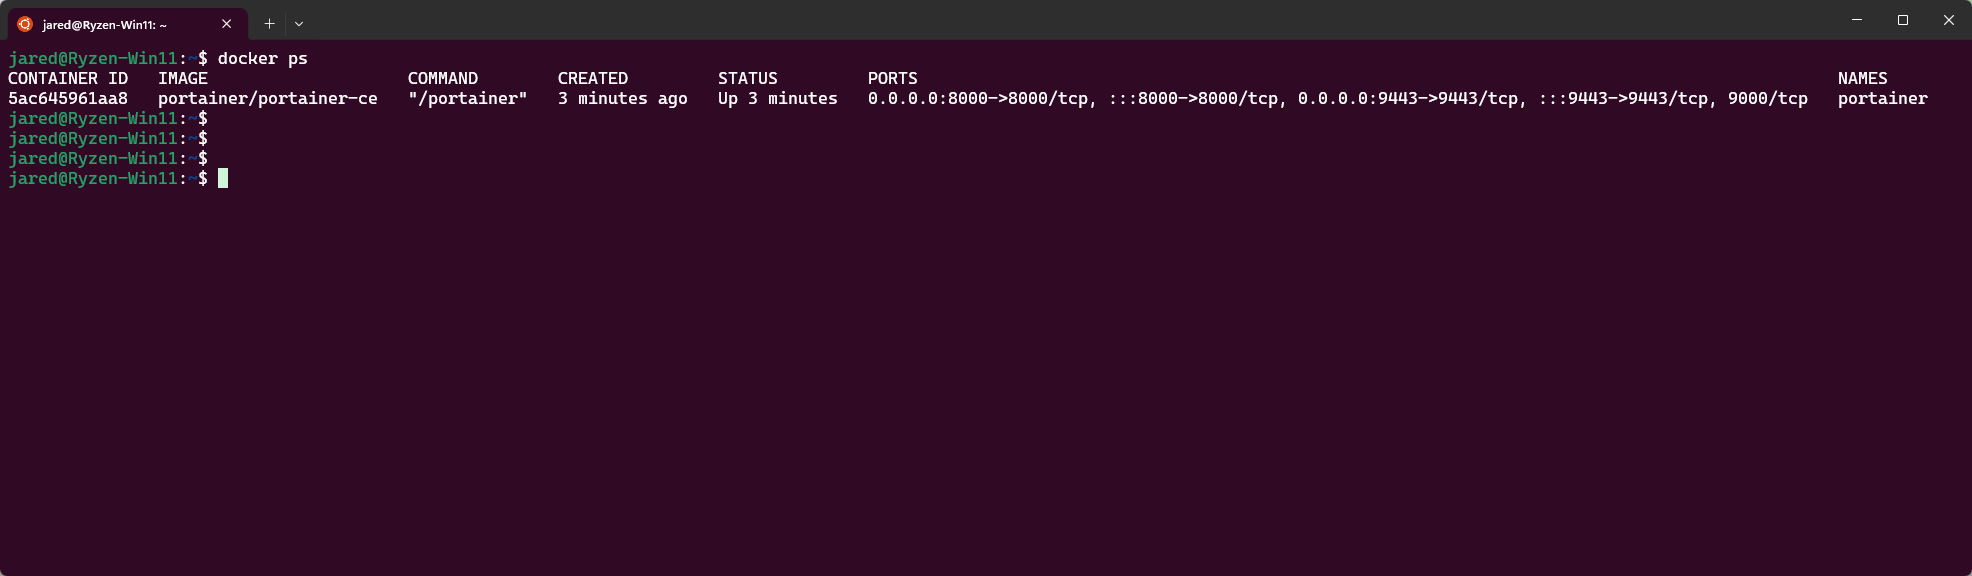
In Windows go to:
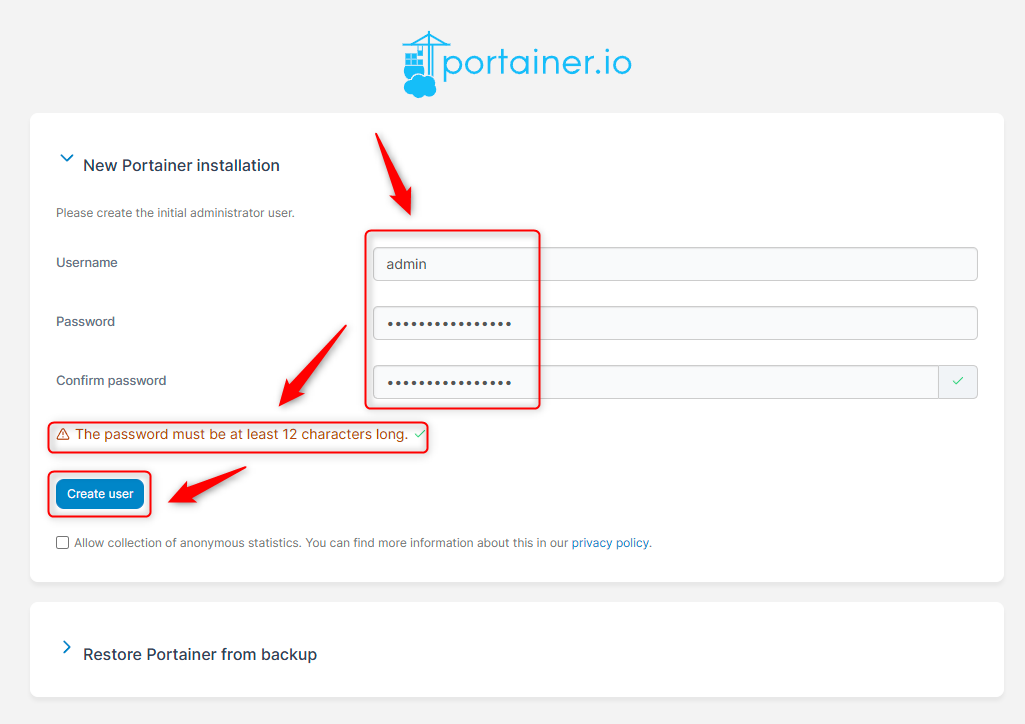
https://localhost:9443You will be prompted to set up an Admin account for the Portainer App.
Note: The password must be at least 12 characters long.
If you take too long here you might need to restart the container and re-enter the information above. To restart the Portainer application type the command:
docker container restart portainerIf you filled out the form in fairly quick order you will see:
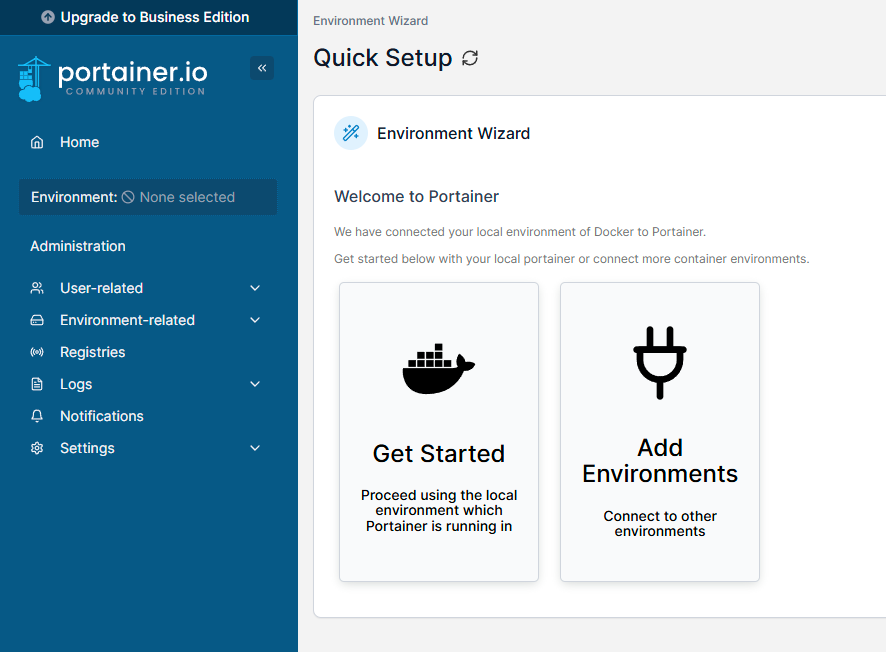
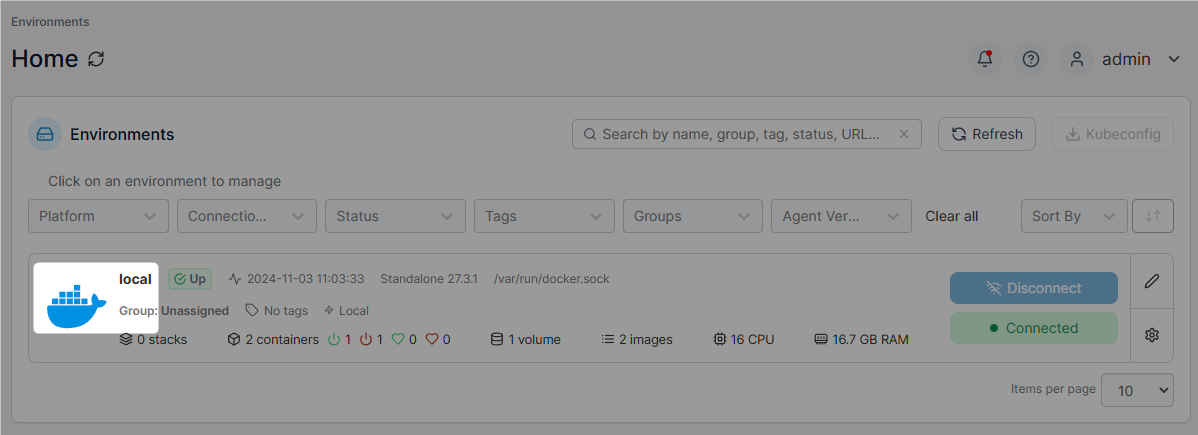
Click “Get Started” and then click on the “local” environment.
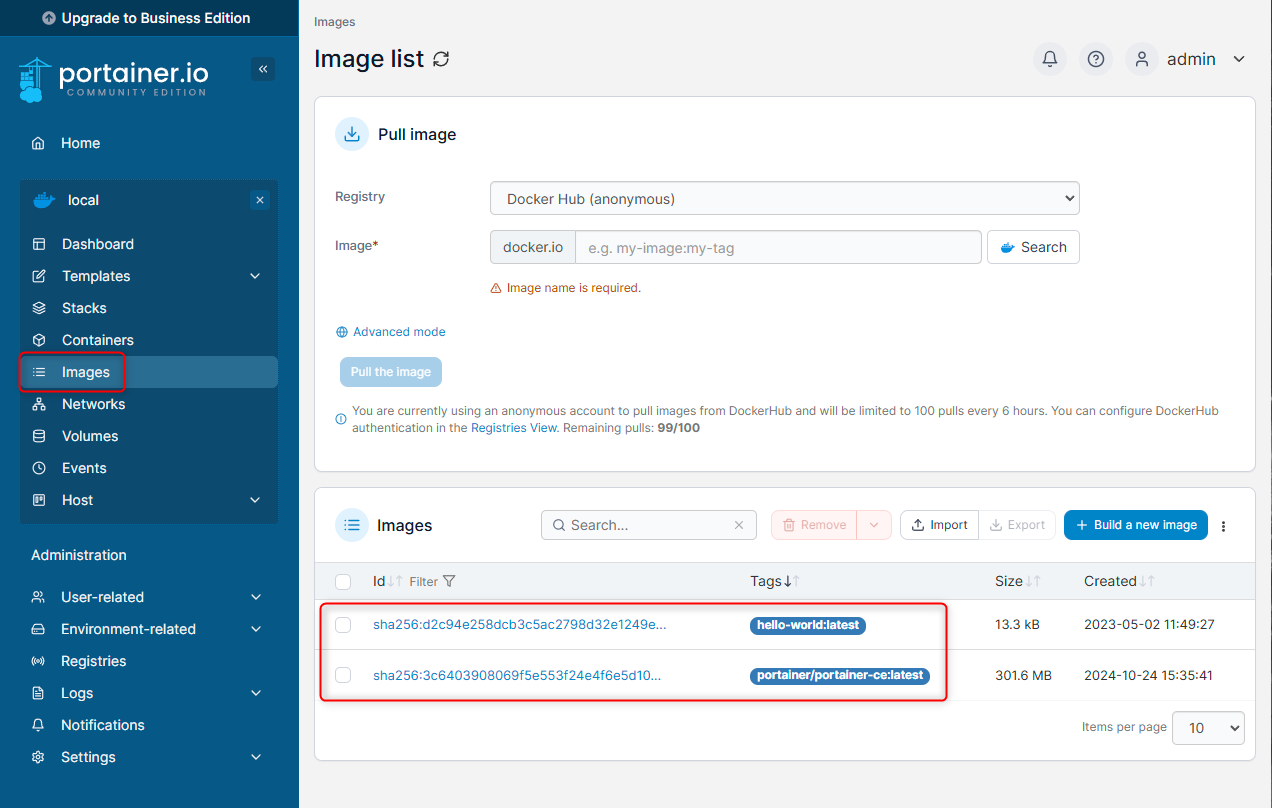
Then click on “Images”.
We can see “Hello World” and “Portainer” have been installed.
Now that we have installed Portainer, we have everything that we would have had by installing Docker Desktop. Portainer can do a lot more without the elementary and login “crap” that gets imposed on you when you install Docker Desktop.