


MERMAID TRAINING - Convert the DMX Firesafety Meme Flowchart to a Mermaid diagram

I was given a chance to give a training session to the entire company I work for as part of an internal spotlight series. While most of spotlight series are presented about current internal projects, I thought it would be fun to enlighten staff about the Mermaid language and how easy it is to use.
The Spotlight presentation was called:
Introdcution to Mermaid DiagramsThe write-up for the course was:
“Mermaid empowers users to create diagrams with speed, efficiency, and even a touch of enjoyment! Whether you’re visualizing workflows, creating Gantt charts, system architectures, or process flows, Mermaid simplifies the process.

Notably, major companies like Microsoft have recognized its potential and seamlessly integrated it into platforms such as GitHub and DevOps. By leveraging Mermaid, you can enhance your documentation, collaboration, and communication within your development projects.”
One thing I am really proud of with the presentation was number of people that attented course and the number of people that reached out afterwards... it was very rewarding. I was told this had been the largest attened spotlight training series and even the CEO attended! While most of the presentation was on how to manually create a mermaid flowchart diagram, knowing how to manually create a diagram can really help with the creation of automation tools as well as working with AI. For the final part of the presentation I also created a utility that could take a data set and convert it dynamically into a diagram.
For the presentation I wanted a project the entire class could have fun working on and allowed me to show basic and advance techniques like theming. When searching for something to use online, I found a meme flowchart called the “DMX fire safety Flowchart”.
While the song the Meme comes from does NOT use language that should be used at work, the song itself is pretty catchy and once you see the flowchart it is pretty funny.

Before working on any project it is usually a good idea to have some planning. When it comes to diagrams, it is really important to understand the object order/flow. Drawing out a basic diagram by hand and labeling things can save a ton of time especially if the diagram becomes large. Below is an example of what I did to prepair and visualize the diagram to the class.

Basic Mermaid code:
flowchart TD
Title[DMX<br />Fire Safety Flowchart]

00[STOP]
01[DROP]
02[IS THERE A FIRE]
03[YES]
04[NO]
05[ROLL]
06[SHUT 'EM DOWN<br />OPEN UP SHOP]
07[OH]
08[NO]
09[THAT'S HOW RUFF<br />RYDERS ROLL]
The code above sets up a “Flowchart” in a “Top-Down” drawing. To get a Left-Right drawing we would use “LR” instead of TD. If we wanted a Bottom-Top Drawing we would use “BT” insteead of TD. All objects are currently set as basic rectangles. All objects are labeled with Numbers. I chose to use a two digit naming convention for the lables. 00, 01, 02 etc.
The objects will be displayed like this:
While this doesn’t look much like a flowchart yet, we can see all the objects are created. Let’s now connect all the object together. You can now see why labeling things in the begining really help with creating the diageam.
flowchart TD
Title[DMX Fire Safety Flowchart]

00[STOP]
01[DROP]
02[IS THERE A FIRE]
03[YES]
04[NO]
05[ROLL]
06[SHUT 'EM DOWN OPEN UP SHOP]
07[OH]
08[NO]
09[THAT'S HOW RUFF RYDERS ROLL]

00 --> 01
01 --> 02
02 --> 03
03 --> 05
02 --> 04
04 --> 06
06 --> 07
07 --> 08
08 --> 09
09 --> 00
As you can see now the diagram is looking REALLY good with very little work. Drawing this out in a program like visio would have taken much, much longer.

Now that we have essentially finished drawing the diagram there are a few things we should do to make the Mermaid diagram look a little closer to the original diagram.
First off the “title”, “Shut ‘em down open up shop” and “That’s how ruff ryders roll” are all on two lines. In mermaid to force a line break we will need to use the HTML code for break “<br />”. Let’s do this now:
flowchart TD
Title[DMX<br />Fire Safety Flowchart]

00[STOP]
01[DROP]
02[IS THERE A FIRE]
03[YES]
04[NO]
05[ROLL]
06[SHUT 'EM DOWN<br />OPEN UP SHOP]
07[OH]
08[NO]
09[THAT'S HOW RUFF<br />RYDERS ROLL]

00 --> 01
01 --> 02
02 --> 03
03 --> 05
02 --> 04
04 --> 06
06 --> 07
07 --> 08
08 --> 09
09 --> 00
As you can see now the diagram is looking a bit closer to what we see in the original diagram.

The next thing we should do is make the objects types a bit closer to the original. For example… Yes and No are cicles, and the first item Stop is a Diamond. Let’s make those changes now:
flowchart TD
Title[DMX<br >Fire Safety Flowchart]

00{STOP}
01[DROP]
02[IS THERE A FIRE]
03((YES))
04((NO))
05[ROLL]
06[SHUT 'EM DOWN<br >OPEN UP SHOP]
07[OH]
08[NO]
09[THAT'S HOW RUFF<br >RYDERS ROLL]

00 --> 01
01 --> 02
02 --> 03
03 --> 05
02 --> 04
04 --> 06
06 --> 07
07 --> 08
08 --> 09
09 --> 00
As you can now see, the diagram is looking much closer to the original.
For most people, you could probably stop here but let’s take this a bit further. The title has a box around it that I don’t really like. It also doesn’t look quite like the original diagram. Also the object “Is there a fire” doesn’t have a background color or a stroke around the outside. To do this we will create two style definitions and put them at the end of the code:
flowchart TD
Title[DMX<br >Fire Safety Flowchart]

00{STOP}
01[DROP]
02[IS THERE A FIRE]
03((YES))
04((NO))
05[ROLL]
06[SHUT 'EM DOWN<br >OPEN UP SHOP]
07[OH]
08[NO]
09[THAT'S HOW RUFF<br >RYDERS ROLL]

00 --> 01
01 --> 02
02 --> 03
03 --> 05
02 --> 04
04 --> 06
06 --> 07
07 --> 08
08 --> 09
09 --> 00

style Title fill:none,stroke:none
style 02 fill:none,stroke:none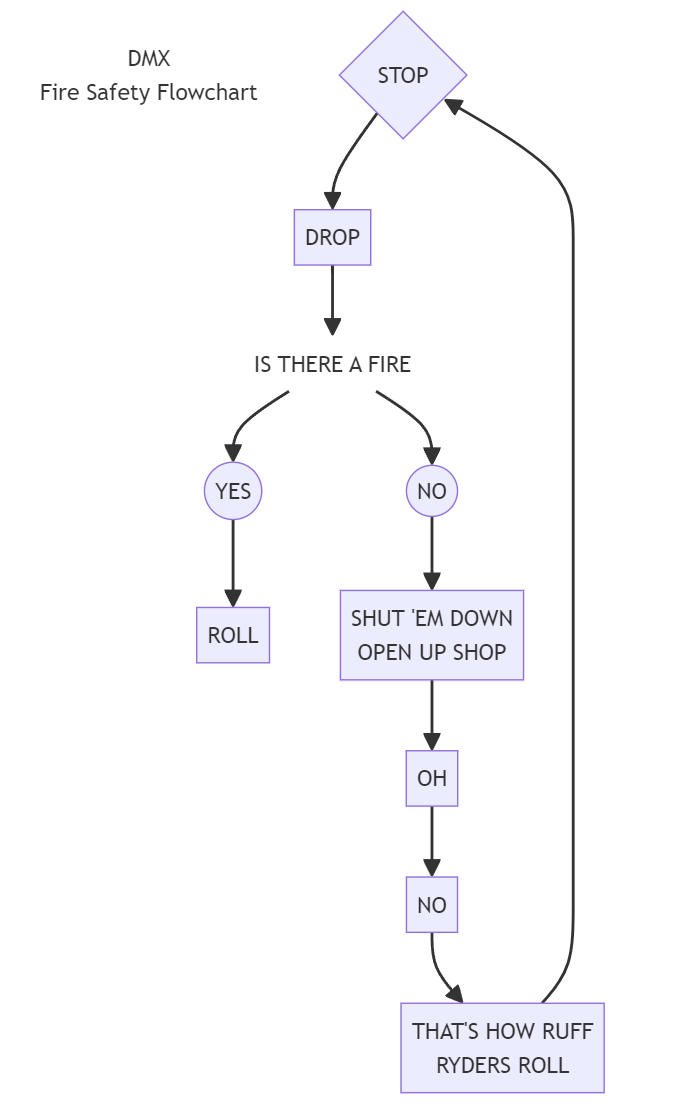
As you can see the diagram is coming along quite nicely. Let’s start adding some “company colors” to the digram using our own custom theme. Themes allow you to customize all items in the diagram all at once. While themes are probably the hardest part of the entire process. Once you have a theme you can use it in one diagram or a million diagrams. My theme will look like this and I will place it above the line where I declare what type of diagram I am using.
%%{
  init: {
    'theme': 'base',
    'themeVariables': {
      'primaryColor': '#8DC63F',
      'primaryTextColor': '#000',
      'primaryBorderColor': '#4C7A15',
      'lineColor': '#f78F1E',
      'secondaryColor': '#3E6379',
      'secondaryTextColor': '#FFFFFF',
      'tertiaryColor': '#FFFFFF'
    }
  }
}%%

flowchart TD
Title[DMX<br >Fire Safety Flowchart]

00{STOP}
01[DROP]
02[IS THERE A FIRE]
03((YES))
04((NO))
05[ROLL]
06[SHUT 'EM DOWN<br >OPEN UP SHOP]
07[OH]
08[NO]
09[THAT'S HOW RUFF<br >RYDERS ROLL]

00 --> 01
01 --> 02
02 --> 03
03 --> 05
02 --> 04
04 --> 06
06 --> 07
07 --> 08
08 --> 09
09 --> 00

style Title fill:none,stroke:none
style 02 fill:none,stroke:none
Now that is looking much more polished and corporate friendly. The last item I want to change is the starting and End object. Having darker colors and black text does not go well together. I want to use a dark red with a white font for that object. Because we are already using a theme for all the objects we now need to specify what style we need for a single item. To do this we will need to add two more lines of code.
The code is called a “Class Definition” and to apply it we need to the call the class and apply it to the object. We will place these custom one off styles at the very bottom of the code. We are now done!
%%{
  init: {
    'theme': 'base',
    'themeVariables': {
      'primaryColor': '#8DC63F',
      'primaryTextColor': '#000',
      'primaryBorderColor': '#4C7A15',
      'lineColor': '#f78F1E',
      'secondaryColor': '#3E6379',
      'secondaryTextColor': '#FFFFFF',
      'tertiaryColor': '#FFFFFF'
    }
  }
}%%

flowchart TD
Title[DMX<br >Fire Safety Flowchart]

00{STOP}
01[DROP]
02[IS THERE A FIRE]
03((YES))
04((NO))
05[ROLL]
06[SHUT 'EM DOWN<br >OPEN UP SHOP]
07[OH]
08[NO]
09[THAT'S HOW RUFF<br >RYDERS ROLL]

00 --> 01
01 --> 02
02 --> 03
03 --> 05
02 --> 04
04 --> 06
06 --> 07
07 --> 08
08 --> 09
09 --> 00

style Title fill:none,stroke:none
style 02 fill:none,stroke:none

classDef Stop fill:#800000,color:white,stroke-width:2px,stroke:#000;
class 00 Stop;